Adaptation
If a pharmacist uses their professional opinion to change a prescription, an adaptation should be submitted. This document should be used to inform the patient's prescriber. In certain provinces, adaptation services are also covered under the provincial plan.
Select the appropriate tab to learn about performing adaptations in your province.
The Adaptation functionality in Propel Rx allows you to generate a form containing details of the professional service to share with the patient's prescriber.
Select the dropdowns below to learn how to use the Adaptation function for different types of prescriptions.
The following steps illustrate how to use the Adaptation function without Provincial Prescription Management (PPM). If your pharmacy has PPM integration, refer to the Adapting or Extending Prescriptions on the EHR section of the Propel Rx British Columbia PPM User Guide.
-
From the Workbench or Patient Profile, select Intake.
-
Enter details of the adaptation.
-
Scan or select the original prescription (or transferred prescription report if it was transferred in).
-
Select Process to open the prescription in Rx Detail.
-
Select Fill.
-
Return to the Patient Profile and select the prescription.
-
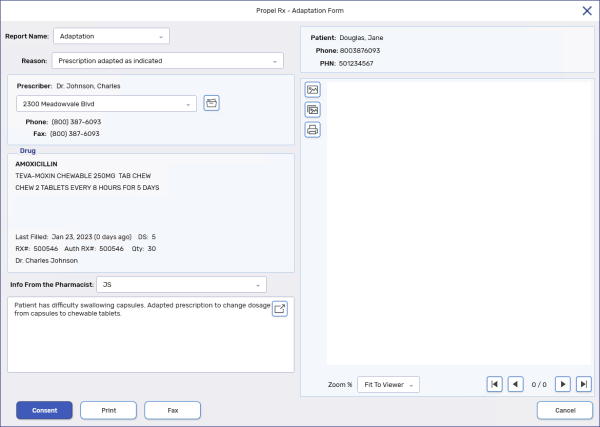
Select Rx > PFS > Adaptation. The Adaptation Form window opens.
-
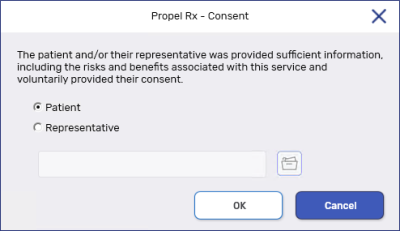
Optional: Select the Consent button if you want to document that consent for the service was gathered.
-
Select whether the patient or their representative provided the consent. If consent is provided by the representative, enter the name of the representative in the given field or search for their Patient Folder. The name of the patient or their representative prints at the bottom of the Adaptation form.
-
Select OK.
-
-
Enter the following information:
-
Reason - select the appropriate reason for the adaptation.
-
Info from the Pharmacist - select the pharmacist's initials and enter any additional information.
-
Attachments - single scan
 or duplex scan
  any necessary documents.
 -
Include Image on Form - select this checkbox if you scanned a document and would like to include the image on the form to the prescriber.
-
-
Select Print or Fax.
-
The Adaptation window closes. The following updates are made:
-
A delta icon
 appears on the Patient Profile for the prescription.
-
A ReqForm row is added to the Patient Folder History tab with details of the report name and reason and whether the report was printed or faxed. The row can be highlighted and detailed to open the Adaptation Form window as read only. The form can be printed by selecting the Print button in the window.

-
-
From the Workbench or Patient Profile, select Intake.
-
Reauthorize the prescription using one of the following methods:
-
From the Workbench or Patient Profile, select Intake > Profile. Select the prescription to be reauthorized > ReAuth > OK. Modify the prescription details to reflect the adaptation and then select Process.
-
From the Patient Profile, select the prescription to be reauthorized > Refill. In Rx Detail, modify the prescription details to reflect the adaptation.
-
-
In Rx Detail, add the attachments from the original prescription to the reauthorization using the Link function.
-
Select Fill.
-
Return to the Patient Profile and select the prescription.
-
Select Rx > PFS > Adaptation. The Adaptation Form window opens.
-
Optional: Select the Consent button if you want to document that consent for the service was gathered.
-
Select whether the patient or their representative provided the consent. If consent is provided by the representative, enter the name of the representative in the given field or search for their Patient Folder. The name of the patient or their representative prints at the bottom of the Adaptation form.
-
Select OK.
-
-
Enter the following information:
-
Reason - select the appropriate reason for the adaptation.
-
Info from the Pharmacist - select the pharmacist's initials and enter any additional information.
-
Attachments - single scan
or duplex scan any necessary documents. -
Include Image on Form - select this checkbox if you scanned a document and would like to include the image on the form to the prescriber.
-
-
Select Print or Fax.
-
The Adaptation window closes. The following updates are made:
-
A delta icon
appears on the Patient Profile for the prescription.
-
A ReqForm row is added to the Patient Folder History tab with details of the report name and reason and whether the report was printed or faxed. The row can be highlighted and detailed to open the Adaptation Form window as read only. The form can be printed by selecting the Print button in the window.
-
The Adaptation functionality in Propel Rx allows you to generate a form containing details of the professional service to share with the patient's prescriber. It also auto-generates a prescription for billing the adaptation service. To use the Adaptation functionality, you must first fill the prescription which you have adapted.
Select the dropdowns below to learn how to use the Adaptation function for different types of prescriptions.
-
From the Workbench or Patient Profile, select Intake.
-
Enter details of the adaptation.
-
Scan or select the original prescription (or transferred prescription report if it was transferred in).
-
Select Process to open the prescription in Rx Detail.
-
If your pharmacy is on RTI, you must enter an indication if the pharmacist is filling the prescription. Otherwise, the indication is optional.
-
Select the EHR tab.
-
From the Indications field, select an indication from the dropdown and/or select the expander button
 to enter a free-form description. Up to 2000 characters can be entered.
-
-
Select Fill.
-
Return to the Patient Profile and select the prescription.
-
Select Rx > PFS > Adaptation. The Adaptation Form window opens.
-
Optional: Select the Consent button if you want to document that consent for the service was gathered.
-
Select whether the patient or their representative provided the consent. If consent is provided by the representative, enter the name of the representative in the given field or search for their Patient Folder. The name of the patient or their representative prints at the bottom of the Adaptation form.
-
Select OK.
-
-
Enter the following information:
-
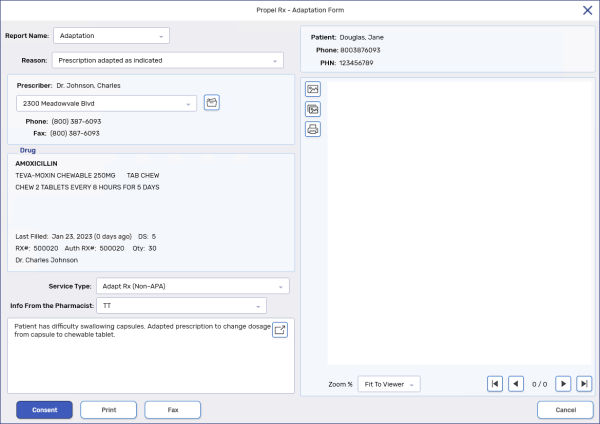
Reason - select the appropriate reason for the adaptation.
-
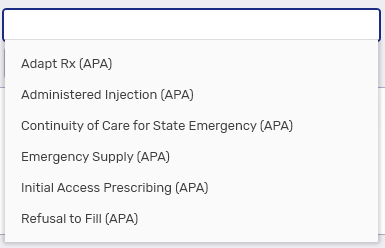
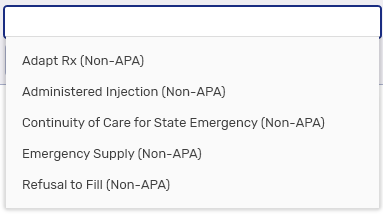
Service Type - select the appropriate type of service being conducted. Depending on the APA designation of the pharmacist entered in the Security window, APA or Non-APA is indicated in brackets beside each service type.
If a non-pharmacist user is logged in, APA options are displayed if the user is linked to an APA pharmacist from the Login window.
-
Info from the Pharmacist - select the pharmacist's initials and enter any additional information.
-
Attachments - single scan
or duplex scan any necessary documents. -
Include Image on Form - select this checkbox if you scanned a document and would like to include the image on the form to the prescriber.
-
-
Select Print or Fax.
-
The Adaptation window closes. The following updates are made:
-
A delta icon
appears on the Patient Profile for the prescription.
-
An incomplete prescription is entered on the Patient Profile with the applicable PIN for billing the adaptation service. Process this prescription to complete billing.
The prescription can be found in the Data Entry queue with a blue sticky. A sticky note of "Adaptation Request" is automatically added to the prescription for your reference.

-
A ReqForm row is added to the Patient Folder History tab with details of the report name and reason and whether the report was printed or faxed. The row can be highlighted and detailed to open the Adaptation Form window as read only. The form can be printed by selecting the Print button in the window.
-
-
From the Workbench or Patient Profile, select Intake.
-
Reauthorize the prescription using one of the following methods:
-
From the Workbench or Patient Profile, select Intake > Profile. Select the prescription to be reauthorized > ReAuth > OK. Modify the prescription details to reflect the adaptation and then select Process.
-
From the Patient Profile, select the prescription to be reauthorized > Refill. In Rx Detail, modify the prescription details to reflect the adaptation.
-
-
In Rx Detail, add the attachments from the original prescription to the reauthorization using the Link function.
-
Select Fill.
-
Return to the Patient Profile and select the prescription.
-
Select Rx > PFS > Adaptation. The Adaptation Form window opens.
-
Optional: Select the Consent button if you want to document that consent for the service was gathered.
-
Select whether the patient or their representative provided the consent. If consent is provided by the representative, enter the name of the representative in the given field or search for their Patient Folder. The name of the patient or their representative prints at the bottom of the Adaptation form.
-
Select OK.
-
-
Enter the following information:
-
Reason - select the appropriate reason for the adaptation.
-
Service Type - select the appropriate type of service being conducted. Depending on the APA designation of the pharmacist entered in the Security window, APA or Non-APA is indicated in brackets beside each service type.
If a non-pharmacist user is logged in, APA options are displayed if the user is linked to an APA pharmacist from the Login window.
-
Info from the Pharmacist - select the pharmacist's initials and enter any additional information.
-
Attachments - single scan
or duplex scan any necessary documents. -
Include Image on Form - select this checkbox if you scanned a document and would like to include the image on the form to the prescriber.
-
-
Select Print or Fax.
-
The Adaptation window closes. The following updates are made:
-
A delta icon
appears on the Patient Profile for the prescription.
-
An incomplete prescription is entered on the Patient Profile with the applicable PIN for billing the adaptation service. Process this prescription to complete billing.
The prescription can be found in the Data Entry queue with a blue sticky. A sticky note of "Adaptation Request" is automatically added to the prescription for your reference.
-
A ReqForm row is added to the Patient Folder History tab with details of the report name and reason and whether the report was printed or faxed. The row can be highlighted and detailed to open the Adaptation Form window as read only. The form can be printed by selecting the Print button in the window.
-
-
Download the prescription from the Patient Medication Profile. Refer to the Transferring in a Prescription section of the Propel Rx Alberta RTI User Guide for detailed steps.
-
In Rx Detail, reauthorize the prescription by updating the QA or changing the prescriber.
-
Select the Attachments button
 . Scan or add the transferred prescription report and original prescription provided by the transferring pharmacy. Select OK once done.
 -
Select Fill.
-
Return to the Patient Profile and select the prescription.
-
Select Rx > PFS > Adaptation. The Adaptation Form window opens.
-
Optional: Select the Consent button if you want to document that consent for the service was gathered.
-
Select whether the patient or their representative provided the consent. If consent is provided by the representative, enter the name of the representative in the given field or search for their Patient Folder. The name of the patient or their representative prints at the bottom of the Adaptation form.
-
Select OK.
-
-
Enter the following information:
-
Reason - select the appropriate reason for the adaptation.
-
Service Type - select the appropriate type of service being conducted. Depending on the APA designation of the pharmacist entered in the Security window, APA or Non-APA is indicated in brackets beside each service type.
If a non-pharmacist user is logged in, APA options are displayed if the user is linked to an APA pharmacist from the Login window.
-
Info from the Pharmacist - select the pharmacist's initials and enter any additional information.
-
Attachments - single scan
or duplex scan any necessary documents. -
Include Image on Form - select this checkbox if you scanned a document and would like to include the image on the form to the prescriber.
-
-
Select Print or Fax.
-
The Adaptation window closes. The following updates are made:
-
A delta icon
appears on the Patient Profile for the prescription.
-
An incomplete prescription is entered on the Patient Profile with the applicable PIN for billing the adaptation service. Process this prescription to complete billing.
The prescription can be found in the Data Entry queue with a blue sticky. A sticky note of "Adaptation Request" is automatically added to the prescription for your reference.
-
A ReqForm row is added to the Patient Folder History tab with details of the report name and reason and whether the report was printed or faxed. The row can be highlighted and detailed to open the Adaptation Form window as read only. The form can be printed by selecting the Print button in the window.
-
The Adaptation functionality in Propel Rx allows you to generate a form containing details of the professional service to share with the patient's prescriber. To use the Adaptation functionality, you must first fill the prescription which you have adapted.
Select the dropdowns below to learn how to use the Adaptation function for different types of prescriptions.
-
From the Workbench or Patient Profile, select Intake.
-
Enter details of the adaptation.
-
Scan or select the original prescription (or transferred prescription report if it was transferred).
-
Select Process to open the prescription in Rx Detail.
-
Select Fill.
-
Return to the Patient Profile and select the prescription.
-
Select Rx > PFS > Adaptation. The Adaptation Form window opens.
-
Optional: Select the Consent button if you want to document that consent for the service was gathered.
-
Select whether the patient or their representative provided the consent. If consent is provided by the representative, enter the name of the representative in the given field or search for their Patient Folder. The name of the patient or their representative prints at the bottom of the Adaptation form.
-
Select OK.
-
-
Enter the following information:
-
Reason - select the appropriate reason for the adaptation.
-
Info from the Pharmacist - select the pharmacist's initials and enter any additional information.
-
Attachments - single scan
or duplex scan any necessary documents. -
Include Image on Form - select this checkbox if you scanned a document and would like to include the image on the form to the prescriber.
-
-
Select Print or Fax.
-
The Adaptation window closes. The following updates are made:
-
A delta icon
appears on the Patient Profile for the prescription.
-
A ReqForm row is added to the Patient Folder History tab with details of the report name and reason and whether the report was printed or faxed. The row can be highlighted and detailed to open the Adaptation Form window as read only. The form can be printed by selecting the Print button in the window.
-
-
From the Workbench or Patient Profile, select Intake.
-
Reauthorize the prescription using one of the following methods:
-
From the Workbench or Patient Profile, select Intake > Profile. Select the prescription to be reauthorized > ReAuth > OK. Modify the prescription details to reflect the adaptation and then select Process.
-
From the Patient Profile, select the prescription to be reauthorized > Refill. In Rx Detail, modify the prescription details to reflect the adaptation.
-
-
In Rx Detail, add the attachments from the original prescription to the reauthorization using the Link function.
-
Select Fill.
-
Return to the Patient Profile and select the prescription.
-
Select Rx > PFS > Adaptation. The Adaptation Form window opens.
-
Optional: Select the Consent button if you want to document that consent for the service was gathered.
-
Select whether the patient or their representative provided the consent. If consent is provided by the representative, enter the name of the representative in the given field or search for their Patient Folder. The name of the patient or their representative prints at the bottom of the Adaptation form.
-
Select OK.
-
-
Enter the following information:
-
Reason - select the appropriate reason for the adaptation.
-
Info from the Pharmacist - select the pharmacist's initials and enter any additional information.
-
Attachments - single scan
or duplex scan any necessary documents. -
Include Image on Form - select this checkbox if you scanned a document and would like to include the image on the form to the prescriber.
-
-
Select Print or Fax.
-
The Adaptation window closes. The following updates are made:
-
A delta icon
appears on the Patient Profile for the prescription.
-
A ReqForm row is added to the Patient Folder History tab with details of the report name and reason and whether the report was printed or faxed. The row can be highlighted and detailed to open the Adaptation Form window as read only. The form can be printed by selecting the Print button in the window.
-